How to create APIs without writing any code: Welcome to NoCodeBackend V2
How to create APIs without writing any code | Welcome to NoCodeBackend V2
In this guide we walk through the brand new UI of NoCodeBackend V2 and show how to build a fully functioning backend — database, API endpoints, documentation and even AI-driven schema generation — in minutes, without writing a single line of server code. This article is based on the latest tutorial released by NoCodeBackend and written from our perspective as creators and users of the platform. We explain each step, share practical tips, and give examples so you can replicate everything we demonstrate.
Step 1: Why NoCodeBackend V2 — an overview
We redesigned the entire UX and UI to make the system smoother, sleeker and more professional. The V2 release focuses on three core improvements:
Faster performance: routine operations like schema creation, endpoint generation and documentation now happen almost instantly.
Improved core features: more powerful schema creation, enhanced security for sensitive fields, and built-in join support.
AI/agentic automation: the AI (agentic) builder can create entire databases and endpoints from natural language prompts.
We built V2 to remove repetitive backend work from projects so teams can focus on product and frontend logic. Throughout this guide we’ll show how to set up databases manually or via AI, test endpoints, add encrypted fields, create joins, and use the AI Builder for complex tasks.
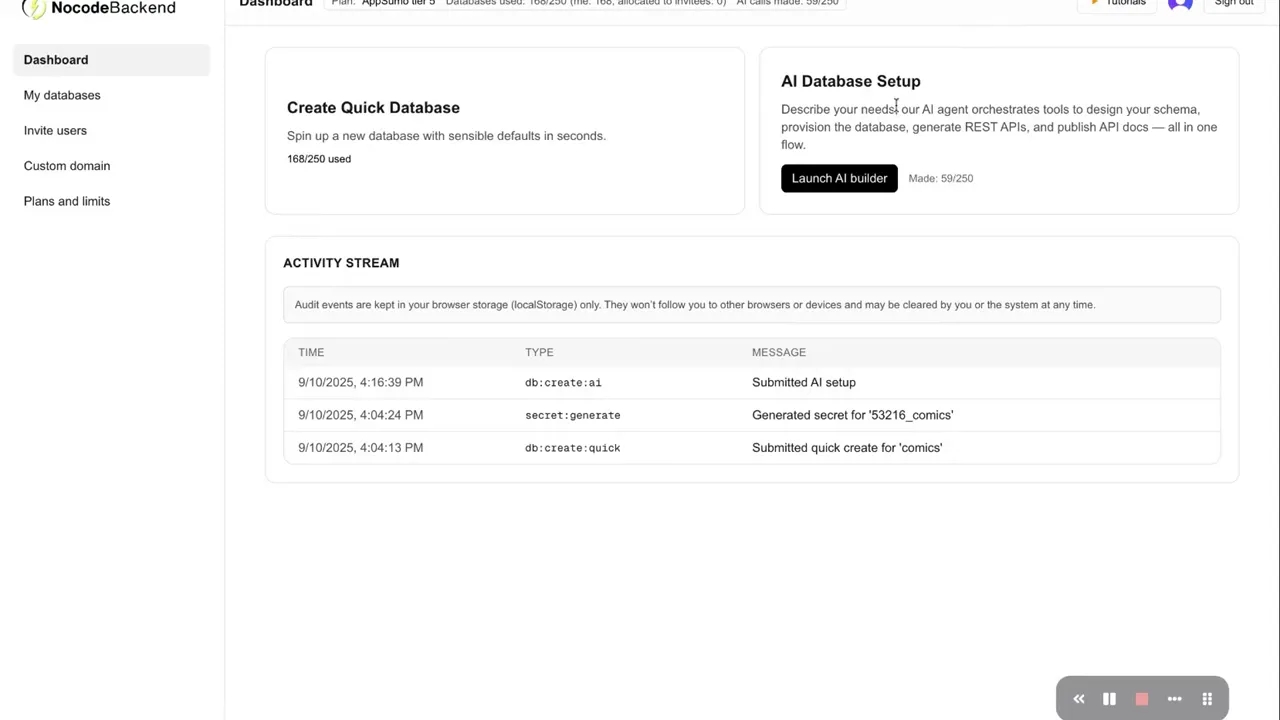
Step 2: Quick create a database — a hands-on walkthrough
Let’s start with the fastest path: Quick Create. This is ideal when we already know the tables and fields we want. The flow we follow is:
Previously the interface only allowed creating one table and one column during the initial setup. That limitation is gone. We can now add multiple tables and many columns in the same operation. This is a major productivity improvement: defining a relational schema is now a single step rather than a multi-step chore.
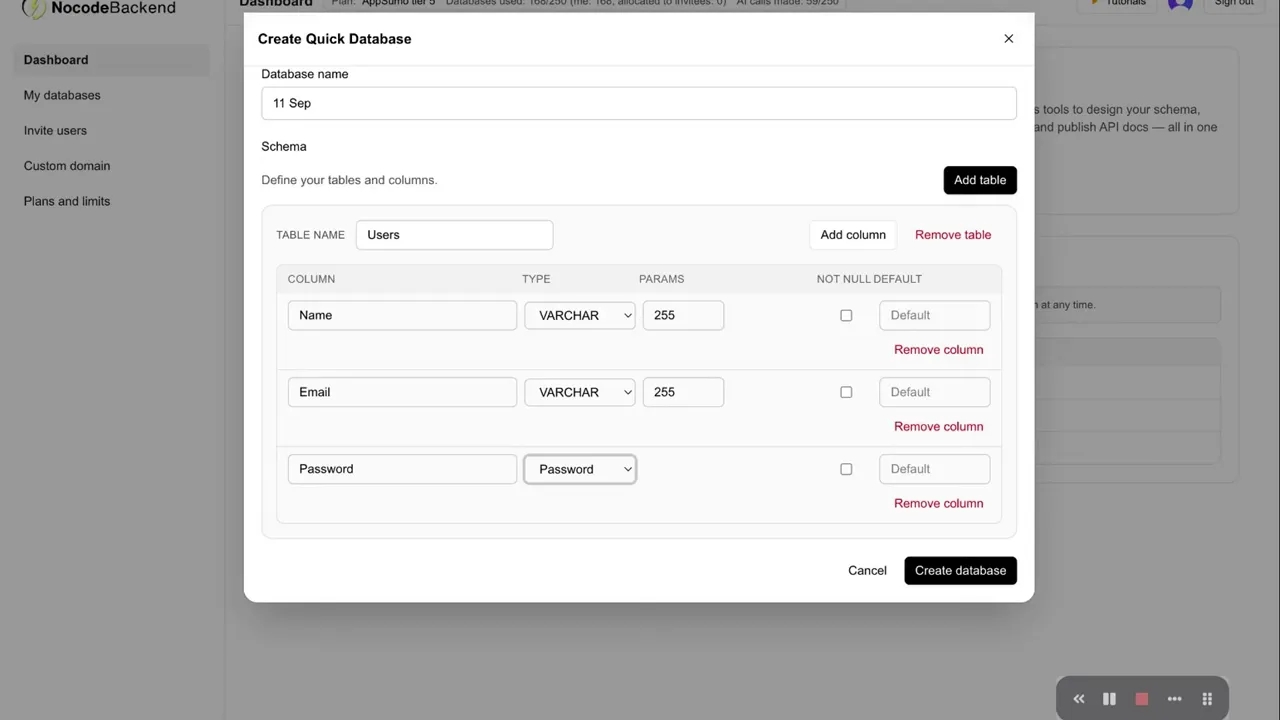
Example walk-through: we created a database named 11 September and defined two tables: users and books. In the users table we added these columns: name (varchar), email (varchar), password (password type). In the books table we added: book_name (varchar) and price (int).
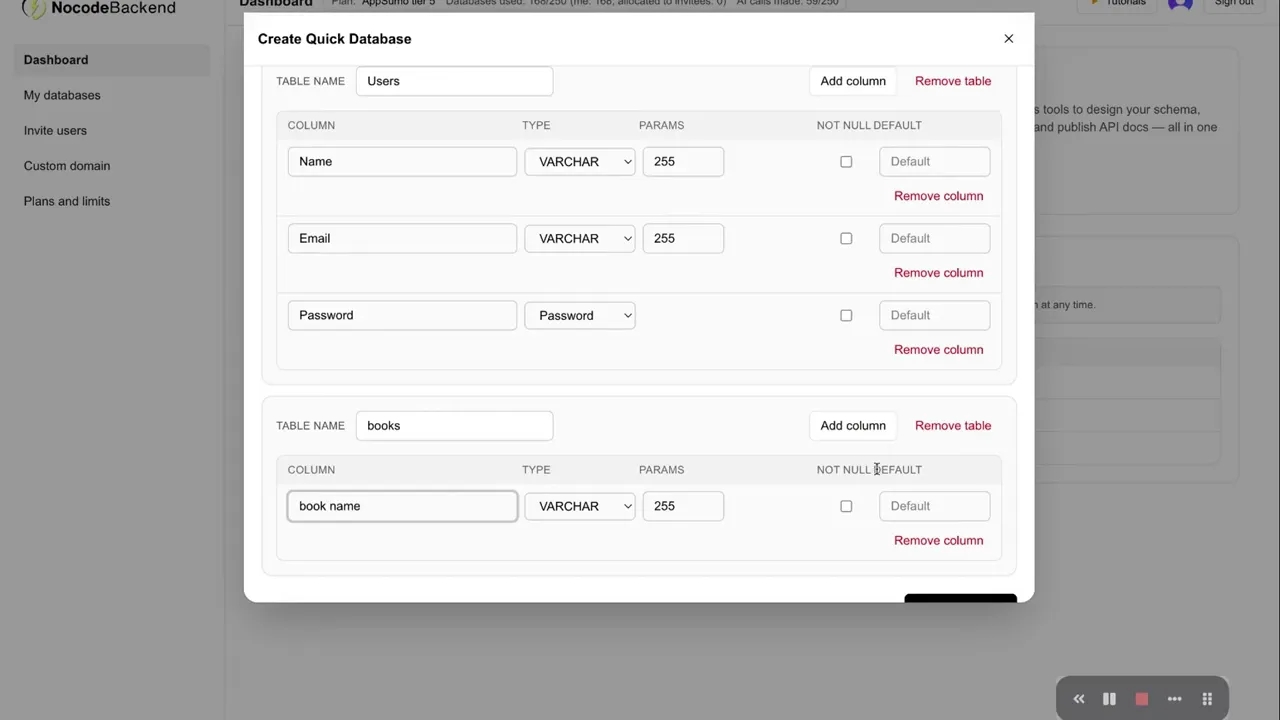
After clicking Create, the system builds the database and generates RESTful endpoints for every table automatically. The entire process — schema to endpoint to documentation — is generated in under a minute.
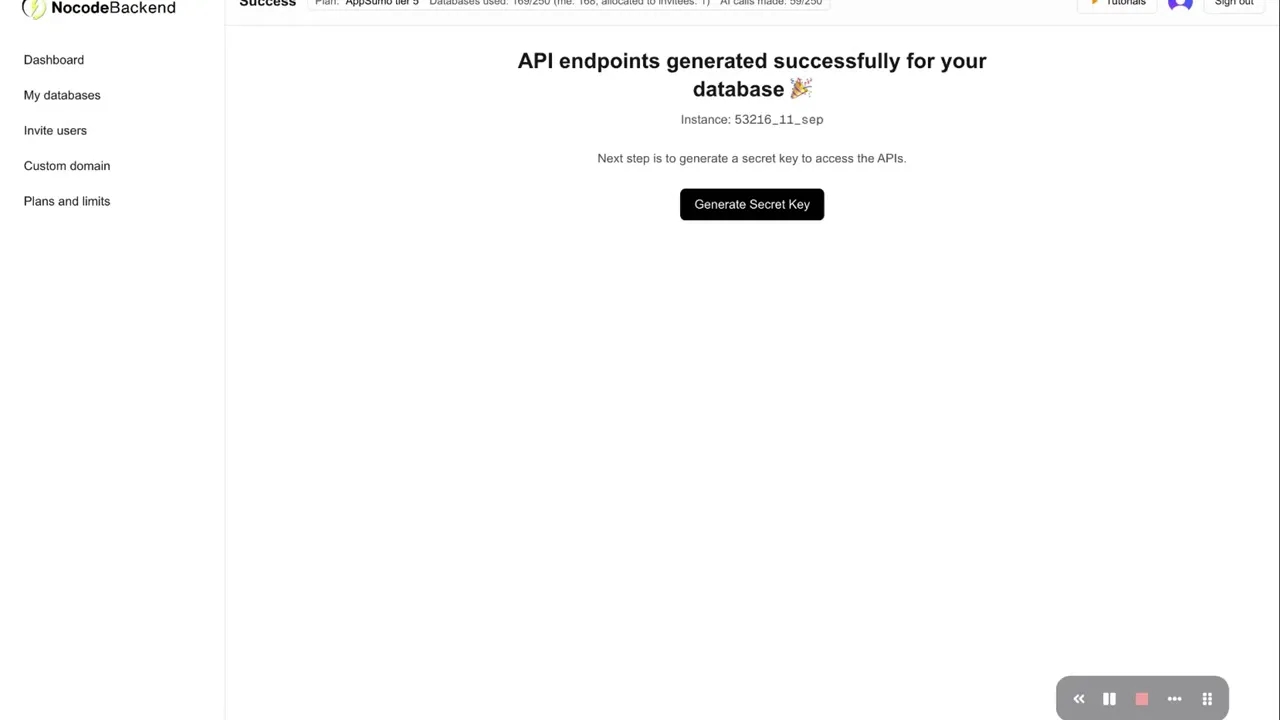
What we get automatically
Database tables and columns created on the backend
REST endpoints for create (POST), read (GET), update (PUT) and delete (DELETE) for each table
Auto-generated API documentation for immediate testing and integration
A secret key used for secure API access
All of these reduce the friction to integrate a backend with any frontend tech stack: React, Webflow, mobile apps or static sites that can make HTTP calls.
Step 3: Understanding the API documentation and testing endpoints
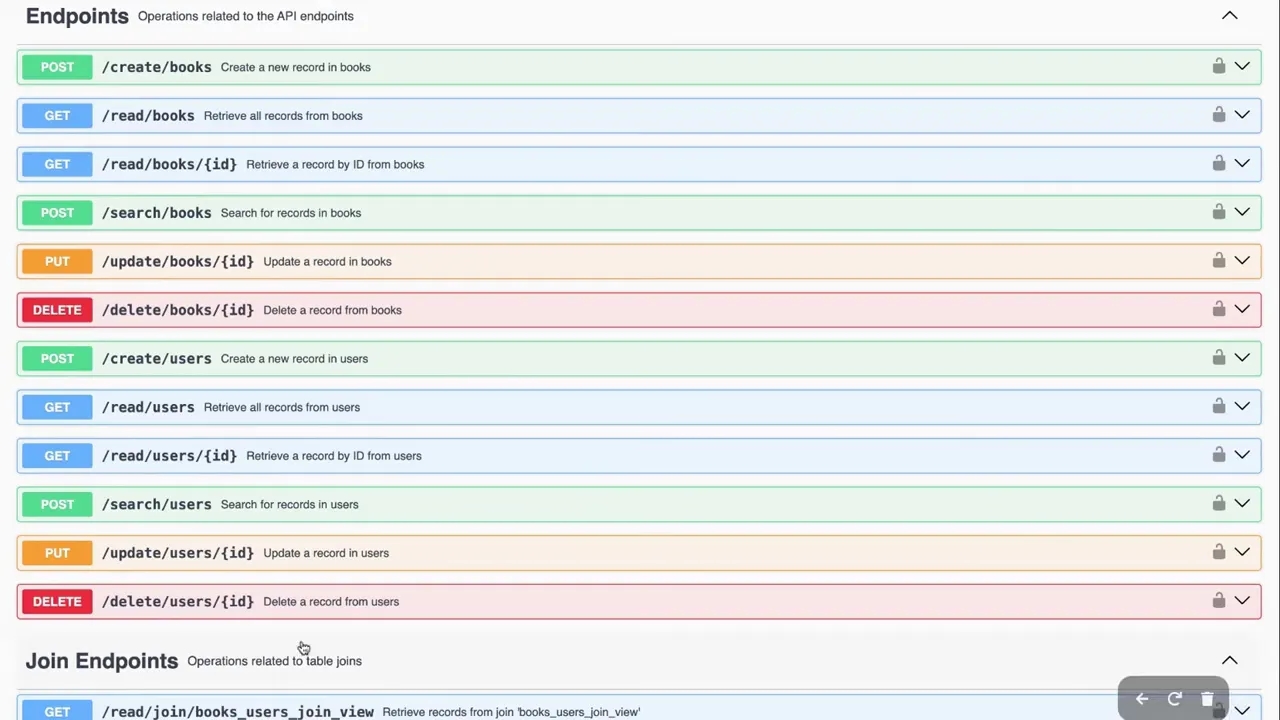
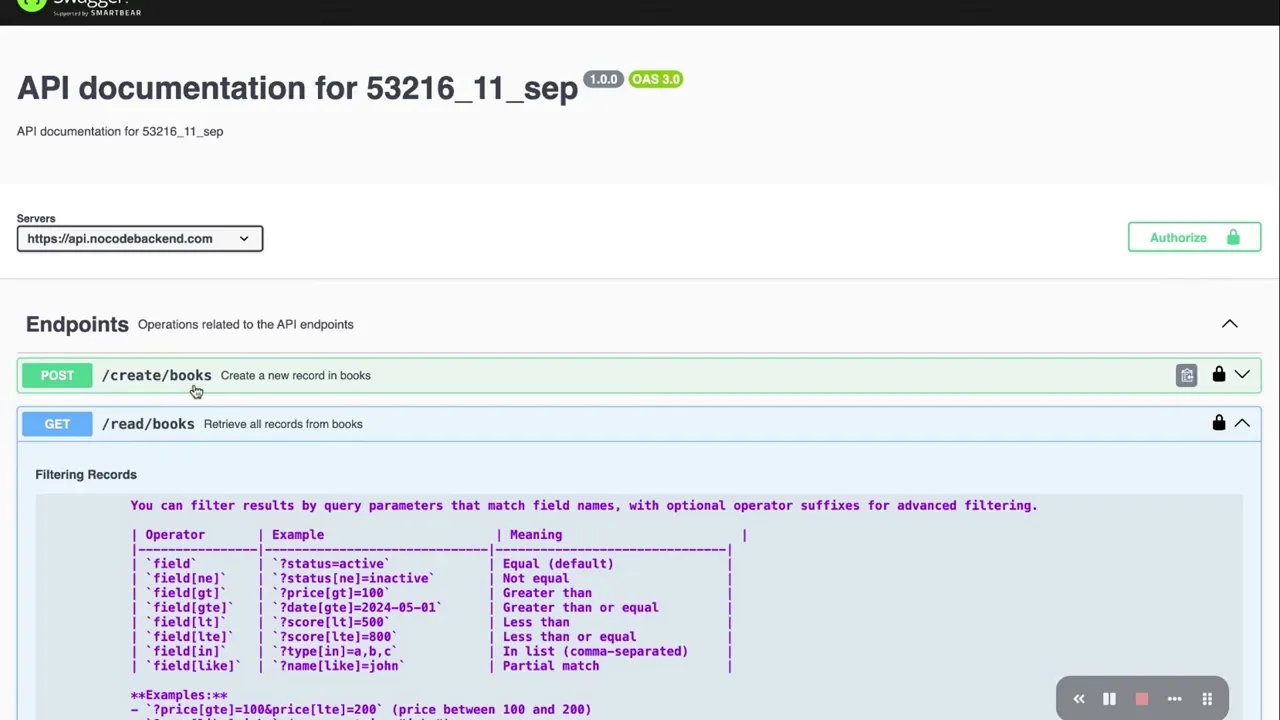
Once the backend is created we click the API Documentation link to open a Swagger-like interface. The documentation shows every table as a path and lists the available methods for each table.
For a table called books we get the typical REST methods. We can:
POST /books — create a new book record
GET /books — read records with optional query filters
PUT /books/{id} — update a book by id
DELETE /books/{id} — delete a book by id
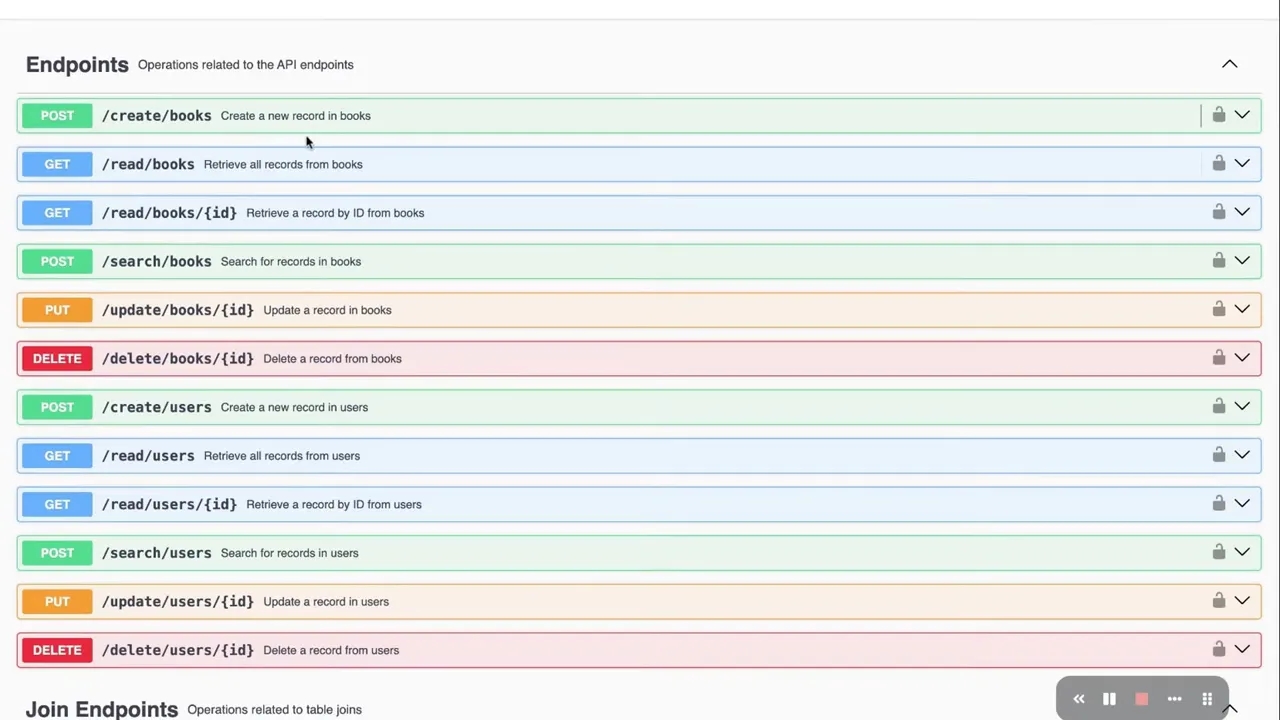
The documentation also provides a ready-made cURL snippet and headers you can copy into your frontend or integration scripts. Instead of devising how to call the API, we get the full example including:
Endpoint URL
Authorization header (Bearer )
JSON request body skeleton
Example response
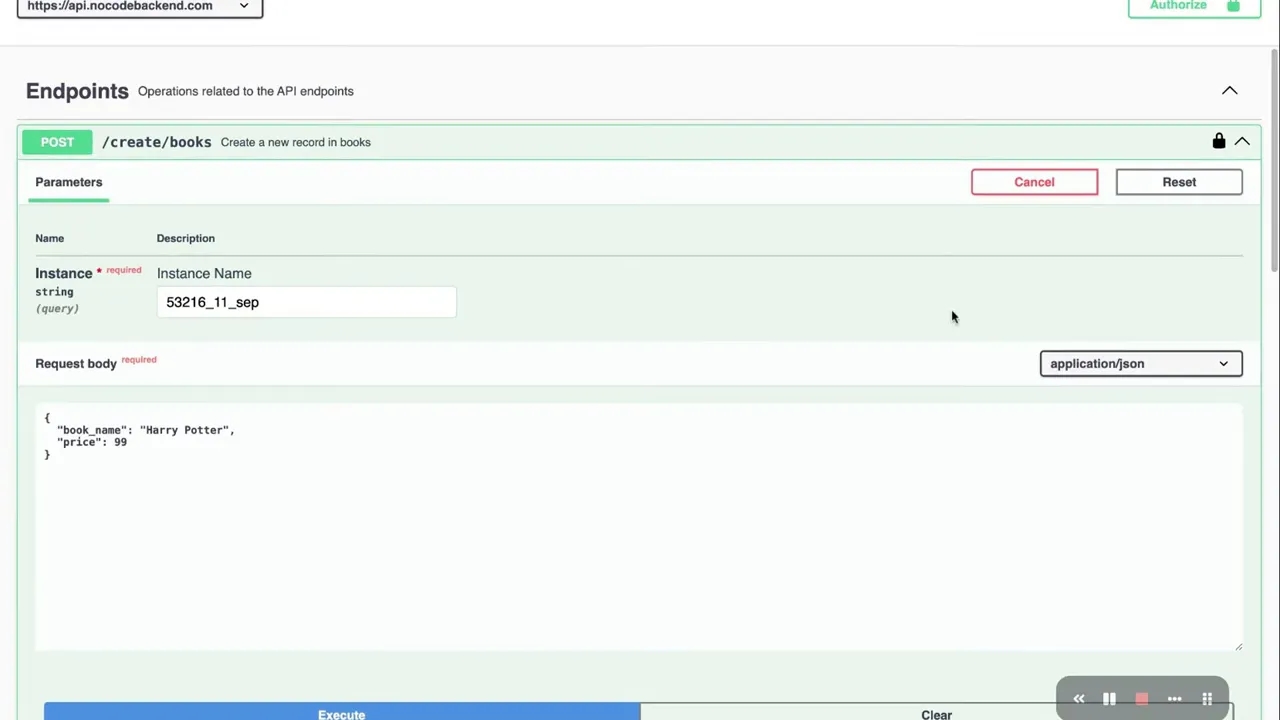
We tested the POST /books endpoint by creating a “Harry Potter” book with price 99. The endpoint returned success and provided a new record id. We then added a second book to demonstrate reading multiple records and to show how IDs are allocated. The read endpoint supports query filters so we can fetch records using conditions like price > 99 or price < 500 — all without writing backend code.
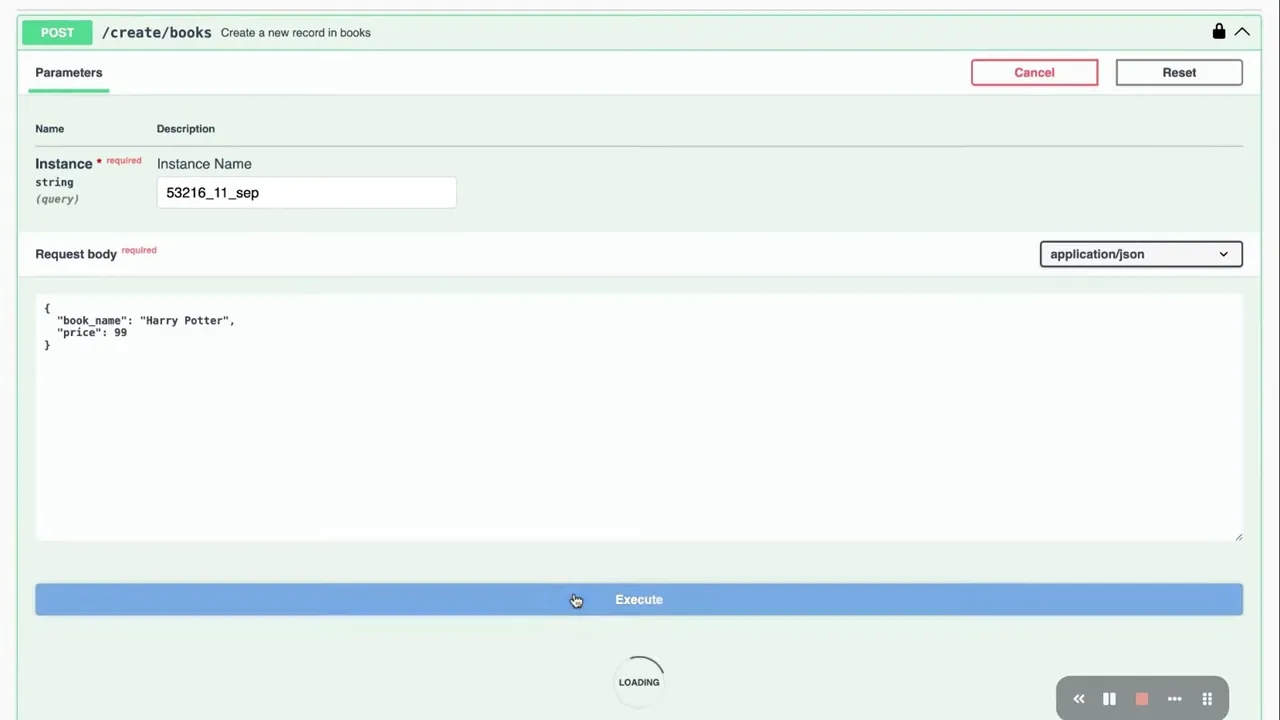
Practical tip: using the cURL snippet Copy the cURL example into your terminal or a tool like Postman to quickly validate behavior. Then implement the same call in your frontend form submission handler. The documentation removes guesswork when wiring form fields to endpoints.
Step 4: Protect sensitive data with the password field type
One of the most important security improvements we added is a native password column type. When you set a column to password:
Values are hashed using a secure algorithm (bcrypt) on write.
Hashed values are returned in responses, not plaintext.
The original value cannot be retrieved via the API — only the hash is stored.
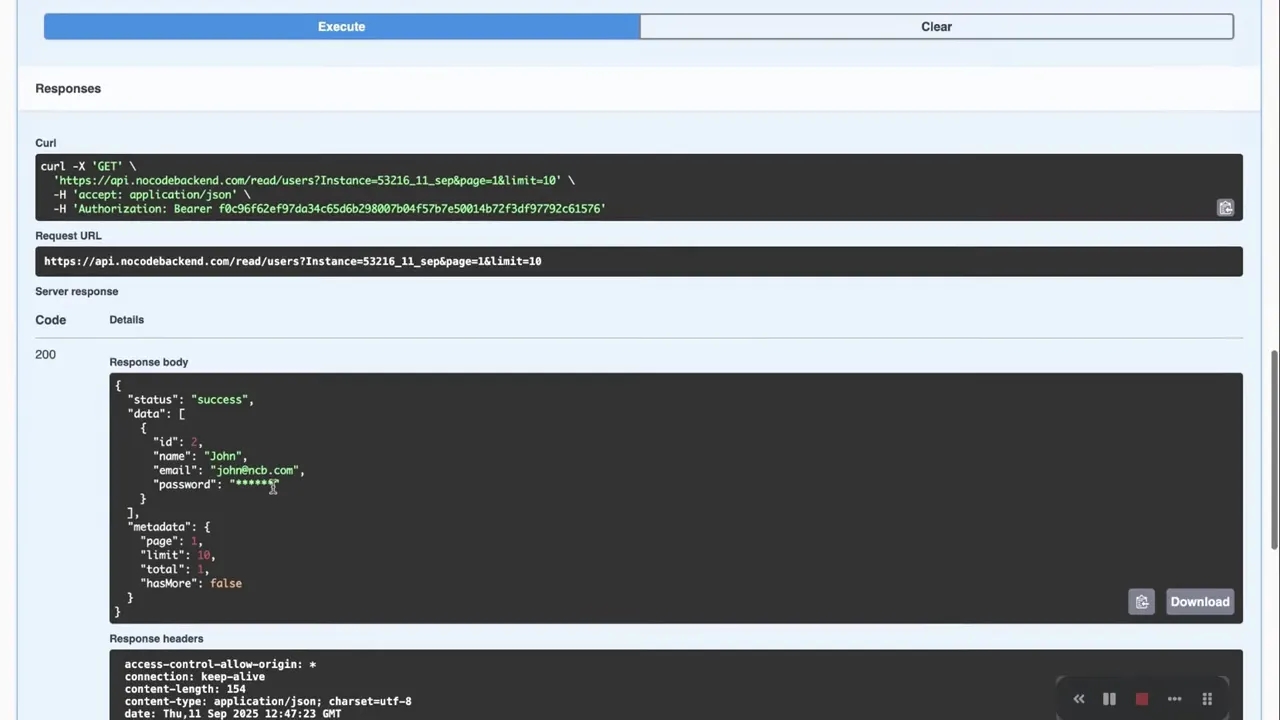
We demonstrated this by creating a user record with a password. When we read the users table, the password value was encrypted (not the plaintext "345" we wrote). This is critical: using the password type protects tokens, OTPs or any sensitive string-like fields you don’t want exposed.
Why bcrypt? It is a battle-tested hashing algorithm designed for password storage. It is slow by design to mitigate brute-force attacks, and it includes salting. By default the platform handles hashing for us, so we never need to implement a hashing flow in our frontend or backend code.
When to use the password type
User account passwords
One-time passwords (OTPs)
Secret tokens or API keys
Any sensitive string data that should never be displayed in plaintext
We should avoid using the password type if we need to query or sort on that column, because hashes are opaque and not searchable in a meaningful way. Use it only for confidentiality.
Step 5: Create joins — merge multiple tables into one endpoint
Joins are essential when we want a combined view of related tables. NoCodeBackend V2 supports three ways to create a join:
Create Join UI: a visual editor for common joins
SQL Query mode: for developers who prefer to write SQL directly
AI-generated joins: describe what you want and the system builds the join
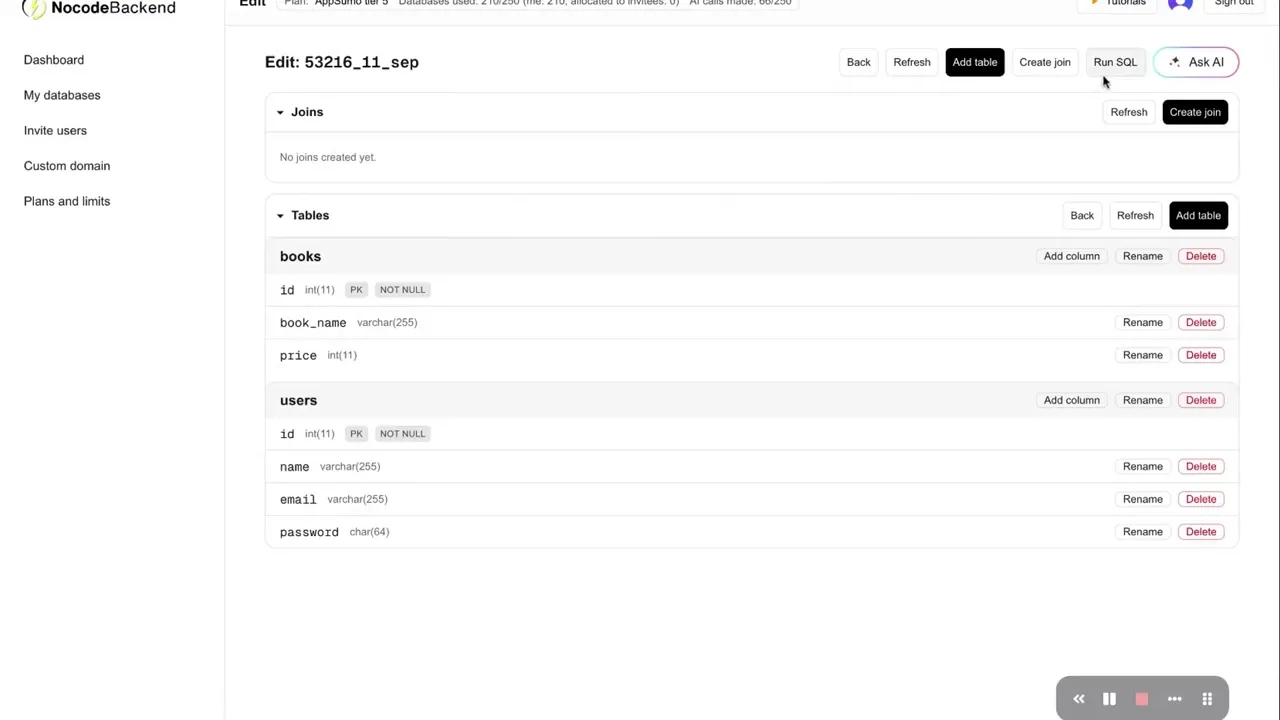
We walked through an example: merge books and users so that a single endpoint returns the book name, price, user name and user email. After creating the join we refreshed the API documentation and noticed the new join path available.
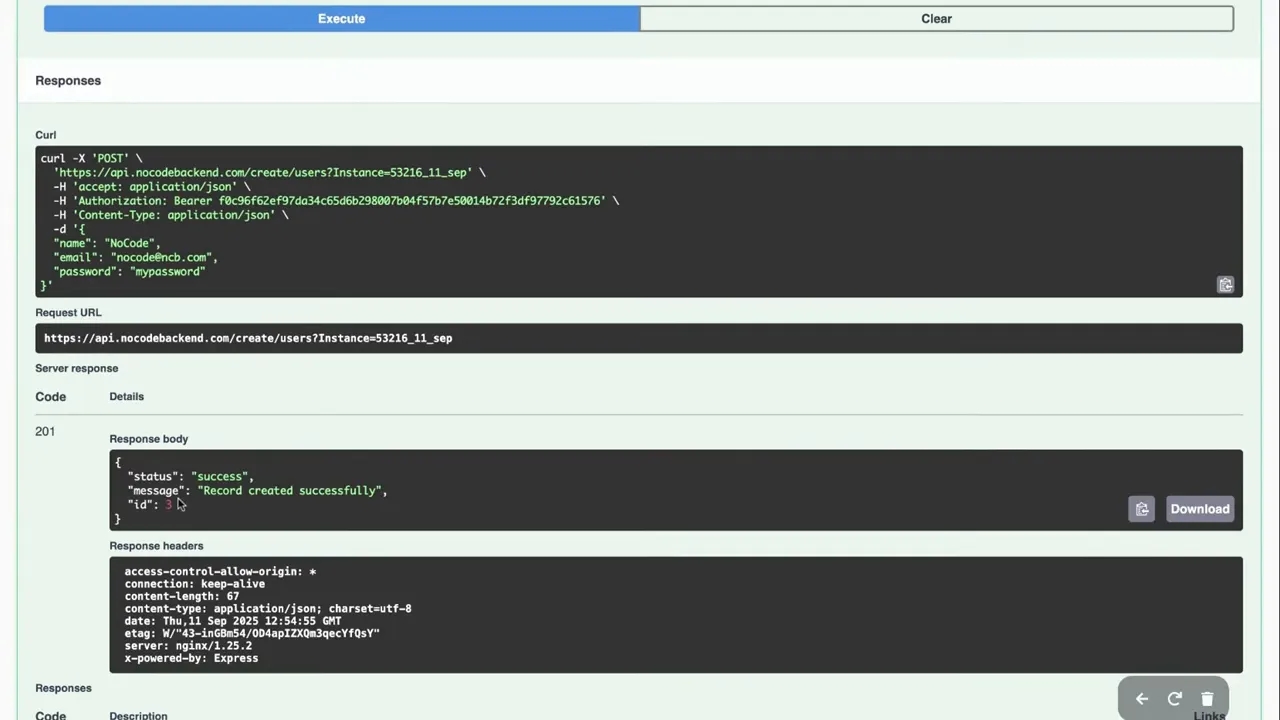
Troubleshooting joins — why you might get no data When we first executed the join endpoint it returned no results. The reason was simple: the ID values in the related tables did not match. Books had IDs 3 and 4, while users had ID 2. For the join to return data the join key values must align. We solved this by creating a new user (ID 3) so the join could match book ID 3 with user ID 3 and produce a combined record.
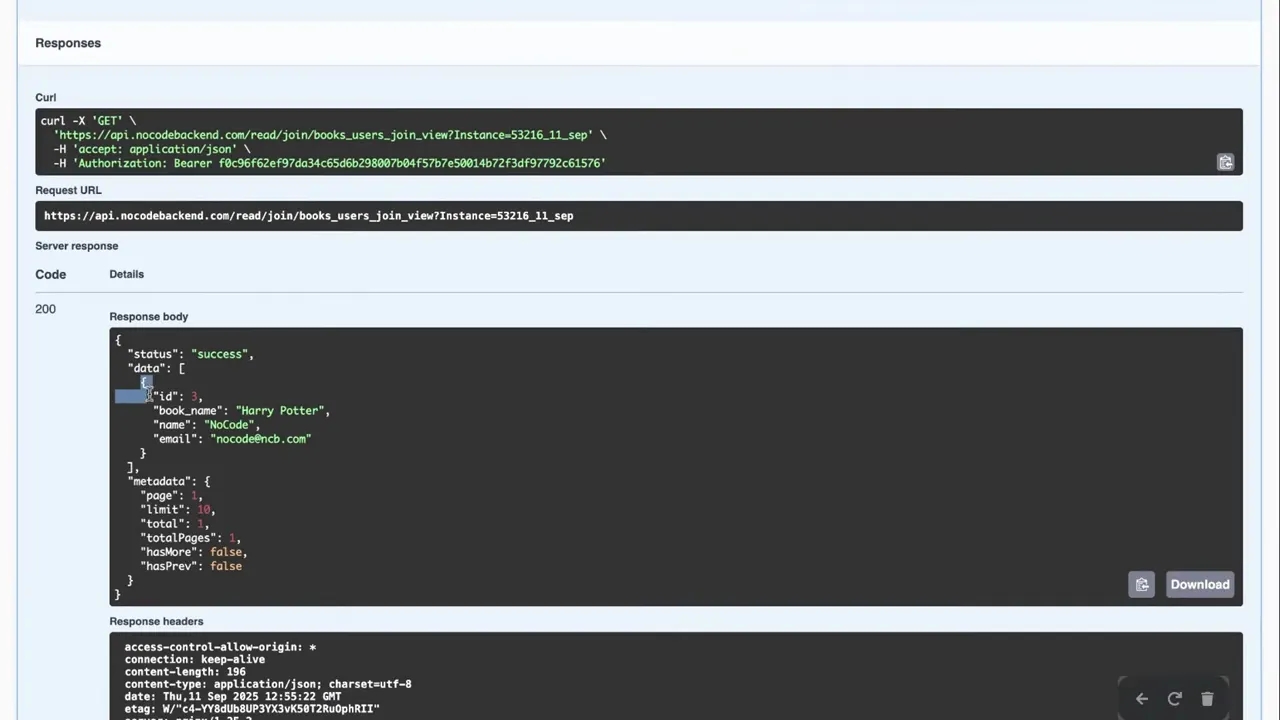
Once we had matching IDs the join returned a single record with both the book and user information. The join endpoint included the same cURL/headers guidance and supported query parameters to further filter the joined view.
Design note In production schemas you should use explicit foreign keys to relate tables (for example, books.owner_id references users.id). That avoids accidental mismatches and makes joins predictable. The platform supports the creation of such references through the schema editor.
Step 6: Use the AI Builder — AI-powered database generation
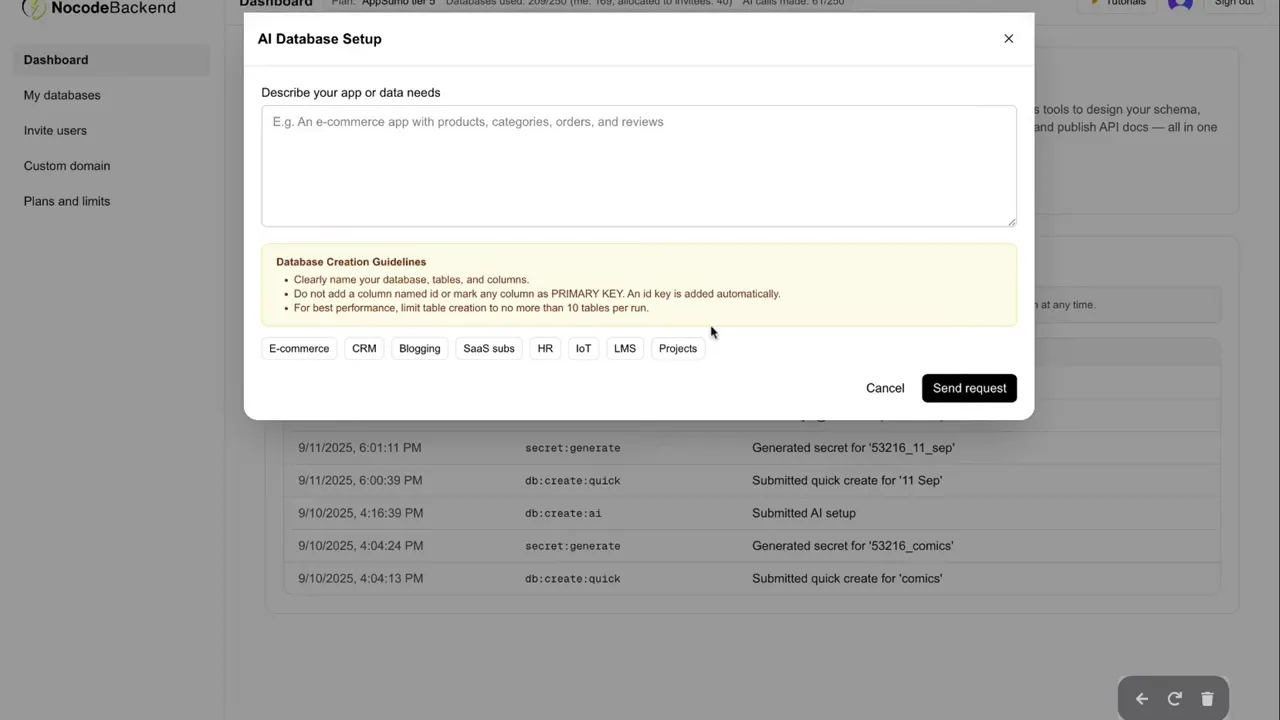
The AI Builder is a powerful productivity tool that can create entire databases and endpoints from a natural language prompt. We used a simple example prompt:
"I need a database called movies with tables for Hollywood and Bollywood. Each table should have columns: movie_name, movie_release_date, movie_genre. movie_genre should be a dropdown with options Action, Sci-Fi, Romance."
We clicked Send Request. Behind the scenes this triggers an agentic pipeline that uses multiple LLM models — each specialized for a specific task — to build the schema, populate dropdown options, generate endpoints and update documentation. The AI (agentic) call orchestrates everything in one go so we get a fully usable backend quickly.
When to use the AI Builder
Rapid prototyping
When you have a verbal idea but not a formal schema
When you want to bootstrap a feature like an LMS, Movies catalog, or Inventory
For non-technical founders who prefer describing requirements in natural language
AI calls are referred to as agentic calls because a single call performs multiple actions: schema creation, endpoint generation, documentation updates and optionally seed data. These calls are extremely useful but should be reviewed — AI-generated schemas may require adjustments for production constraints (indexes, foreign keys, validation rules).
Step 7: Integrate with your frontend — practical examples
Integration is straightforward because each endpoint is a standard REST endpoint. The typical frontend flow is:
Example: React form for creating a Book
Fields: book_name, price
On submit: POST to /books with body { "book_name": "XYZ", "price": 99 } and Authorization header
On success: redirect to dashboard which calls GET /books to refresh the list
Because the documentation provides cURL examples and request schemas, wiring up the frontend is mostly a matter of copying the endpoint URL and confirming the exact key names used by the generated API.
Query filters and dashboards The GET endpoints support query filters so dashboards can show dynamic views without server logic. Example filters:
price > 100
created_at < 2024-01-01
name contains "Harry"
We can call the GET endpoint with filter params from the frontend and render a paginated list. This keeps the frontend simple and avoids building backend filtering logic manually.
Step 8: Team features, custom domain and account limits
NoCodeBackend V2 includes collaboration features and plan-level controls:
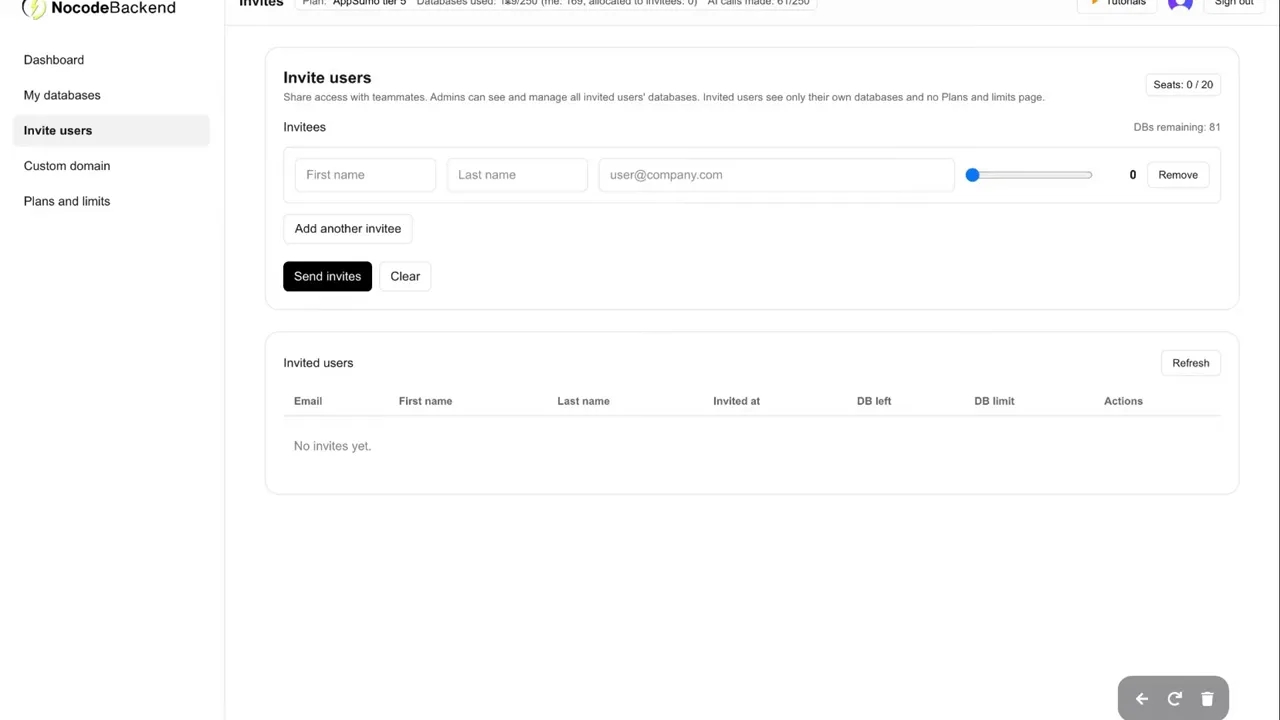
Invite users: Depending on our plan we can invite teammates to create or edit databases. The number of invitees and their privileges depend on the subscription level.
Shared with me: a dedicated tab to view databases created by invitees and filter by the creator.
Custom domain for API docs: on eligible plans we can serve the API documentation from our own domain/subdomain instead of api.nocodebackend.com.
Quota allocation: database and resource quotas are taken from the overall account plan.
Custom domains are useful for branding and for embedding the docs into internal developer portals. We can configure a CNAME and serve docs as if they belonged to our product domain.
Step 9: Plans, credits and agentic calls
Two notable monetization items to understand:
Database credits and one-time purchases: at launch additional databases or capabilities can be purchased as one-time credits. These credits do not expire while the account is active.
Agentic AI credits: AI calls are more powerful than a single AI API call because they orchestrate multiple steps. Those are sold as credits and currently offered as one-time purchases; the pricing model may transition to monthly or yearly subscriptions in the future.
We should plan usage accordingly. For prototyping we can bulk-buy agentic credits at a one-time price to experiment with rapid generation. For production or long-term usage, keep an eye on subscription changes so we can budget properly.
Step 10: Best practices and tips
To get the most out of NoCodeBackend we recommend the following:
Design your schema thoughtfully: think about foreign keys and indexing for tables that will store large datasets.
Use the password type for confidentiality: store only hashed values for sensitive data, and never attempt to store plaintext secrets.
Leverage joins for dashboards: instead of creating denormalized copies, use join endpoints to present combined views.
Validate data on the frontend too: while the backend will accept valid formats, client-side validation improves UX and reduces bad requests.
Audit generated schemas: AI can be fast, but we should review generated tables and fields to confirm they match business requirements.
Keep API keys secret: do not embed the account secret directly in public client-side code. Use server-side proxies when public exposure is a risk, or rotate keys frequently.
For teams building production systems, treat NoCodeBackend as a backend-as-a-service (BaaS) and follow standard operational practices: monitoring, backups, and access control management.
Step 11: Troubleshooting common issues
Here are the common hiccups we encountered and how to fix them:
No data returned by join: confirm join keys align and that referenced records exist.
Unauthorized errors: verify the Authorization header includes the correct secret key and that the key wasn't regenerated or revoked.
Missing columns or wrong field names: check the documentation for exact JSON property names — AI-generated names may differ slightly from natural language, and you can edit them in the schema editor.
Rate limits or credits exhausted: review plan and credit balance in the dashboard and purchase more credits if needed.
Password fields visible: if you see any plaintext in a password field, contact support and rotate credentials immediately. Designed behavior is to never surface plaintext.
Frequently Asked Questions (FAQ)
Conclusion — launch faster with less friction
NoCodeBackend V2 is built to accelerate product development by automating the repetitive backend tasks that usually slow teams down: creating databases, generating endpoints, securing fields and exposing clear documentation. Whether we prefer a hands-on visual approach or want to describe requirements in plain English and let AI generate the schema, the platform supports both. Agentic AI Builder calls are particularly powerful for bootstrapping new features quickly.
We encourage teams to prototype with NoCodeBackend to validate ideas and iterate faster. For production systems, follow standard best practices: review AI-generated schemas, use password fields for sensitive data, control API keys and manage roles carefully.
If you have further questions, reach out to the support channels available in the dashboard and consult the documentation. We’re excited to see what you build with NoCodeBackend V2 — from small prototypes to full-featured apps — without having to write backend infrastructure by hand.
Further reading and next steps
If you want to dive deeper, try these next steps in your NoCodeBackend account:
Experiment with the AI Builder using a small prototype prompt and review the generated schema.
Create a test database with Quick Create, then open the API documentation and copy the cURL snippets into Postman.
Enable a password column for a sample users table to observe bcrypt hashing in action.
Set up a join between two small tables and verify matching foreign keys to see joined results.
If you hit issues, use the support channels in your dashboard or consult the platform documentation available from your account. These resources are the quickest way to get account-specific help and to view screenshots or video walkthroughs for each step.
Create Your First API Now!
Leverage NoCodeBackend to build enterprise grade APIs in seconds!
Last updated